
Saturday, October 22, 2011
Technical difficulties
Due to technical difficulties, I won't be able to make any posts for about a week. I want to invite you to please check back next Sunday for some new ideas on using an older product. I'd like to encourage you to become a follower either by email or by a google account and you will receive my next post automatically. Hope you have a good week and happy crafting. TTFN, Peg
Wednesday, October 19, 2011
Penny Black Christmas at Dusk card challenge
 I am so excited. I am the winner of the Penny Black Christmas at Dusk Card challenge. Ok, so it was a random drawing of all the entrants but I am very excited none the less.
 These are the fabulous stickers that my friend Jill Foster created for Penny Black. They are "Christmas at Dusk:
Hence the name of the challenge. If you have never tried or seen a Penny Black sticker sheet, I urge you to get some (My favorite store Mementos can help you with that, check out the link to the right).
These aren't your child's stickers. these are art with an adhesive back. The colors are so brilliant and beautiful and the variety is wide. Check out what Jill did with the stickers, she is so talented. (you'll need to scroll thru some of her other beautiful cards to the bottom of the blog page, but I think you'll enjoy it
After looking at Jill's cards, I was stumped, what she did with the cards was very similar to what I had envisioned doing with them. So, I had to put on my thinking cap and try to "think outside the box" or in this case "think outside the sticker sheet"
I tried to do something different on each card. Card number one has a tone on tone background using distress ink. What I did different with the sticker was to trim the sentiment so that only the words remain. I also distressed the bird sticker, added distress ink and glossy accents on the bird.
 |
Card #2, the ornaments, I used glossy accents to give the ornaments dimension. I stamped Happy Holidays using Staz On. You have to use Staz On on the glossy sticker or the ink will rub right off. The background was embossed with a Sizzex embossing folder, I sanded it so that the white of the paper showed thru then used distress ink, walnut, to cut the brightness.
 |
Card #3 is my favorite. The smallest sticker was 1 1/2 inches wide, which dictated the size of the squares. I cut 1 1/2 inch squares out of 4 completely different stickers/designs. This works because all of the stickers on this page are the same tone and color family. I popped them up on black Bazzil cardstock and I used my Tim Holtz ruler to space the holes around the edge to add dimension and finally, it's not finished without some type of bling. :)

Hope you have fun thinking outside the box too. TTFN, Peg
Sunday, October 16, 2011
Old stamp new techniques
This week has been so much fun, but I found out that I really don't like it when my work interferes with my blog!
I don't know about you, but I keep my stamps forever, even if I don't think I'll ever use them again. But recently I have started pulling some of my old scene stamps out an playing with new techniques, products and papers.

I've had this stamp for 10+ years. This card is an example of how I usually used it.Ten years ago, markers were very basic, created saturated color and rarely had shades to create shadows, so I used water color pencils to color the individual components. I used pop dots to layer it over frayed burlap and printed paper. I adhered a twine bow. The overall look has a country feel.
Card #2 uses Copic Markers, Tim Holtz distress inks and Tiny Stapler, Glossy Accents, and super fine twine.
Card #2 uses Copic Markers, Tim Holtz distress inks and Tiny Stapler, Glossy Accents, and super fine twine.

Even though the stamp colors are very similar to the original, using the Copic Markers and stamping a custom background, this card, had different layers, dimension and the overall esthetic is less "country".
I love the distress inks for creating backgrounds. By using different colors and the blending tool, you can match any other color or ink source. The blanket is made from Copic BG18 teal blue, the background is a base of broken china with a light layer of shabby shutters (green) and another layer of broken china on top. The key to this is the right paper (Tiara White) and to keep the ink moving, don't let it dry, it will blend smoothly if you do.
Thanks for visiting, hope you come back soon. TTFN, Peg
Tuesday, October 11, 2011
Scary girl
Ever see some really cool scrapbook paper but you don't really scrapbook and the elements on the page are too big to use on a card?
The12 by 12 paper on the left is Authentique Enchanted, it has a wonder stamped look and all these great spiders, webs and lace,not to mention polka dots. the paper on the right is the cutest girl and pumpkins is Mischievous by My Mind's Eye . As soon as I saw them I thought they were made for each other.


and this result. It's an 8 by 8 canvas base and it currently makes my office happier. :)

I used two sheets of the Mischievous in order to pop up certain elements. I cut out the girl, her hair and all 3 pumpkins from page one and the belt, shoes and hat and hair from page 2. Using Tim Holtz's distress ink in wild honey I stamped random images on the faces of the pumpkins then using black soot distress ink I stamped all the hats. I cut the smallest pumpkin off straight below the hat to make the pumpkin bucket. I inked all the pumpkins, hair and hats with corresponding ink around the edges to give some dimension. I poked small holes in the bucket and used a small piece of black wire for the handle. I threaded the belt piece thru a small metal buckle and glued it on to the girl using Glossy accents as glue (this works great, and dries quickly). I layered the hat/hair and boots directly over the same elements.
Because I wanted a distress look to the canvas, I did not gesso it first, but painted directly on the canvas with black acrylic paint. After it dried, I sanded out the edges and then used wild honey distress ink to tone down and "dirty" up the canvas a bit.
Look back at the Authentique paper, I could've used either corner but I really liked the spider web and little spider hanging down. The background was cut to7.5 by 7.5 inches before the edges were distressed with the black soot and wild honey inks. I glued the paper to the dry canvas.
I used foam tape on the girl, one pumpkin with a hat and the pumpkin bucket to give them a little emphasis. The other pumpkin was glued straight to the background. Using glossy accents I highlighted the her hat, boots, the faces on the pumpkins and the cute little spider. She got a nice pair of button eyes and a stamped sentiment.
Hope this inspires you to look at scrapbook paper in new ways. ttfn.
Monday, October 10, 2011
Day 2 So Thankful
I would really like to tell you how much I appreciate all of your wonderful positive comments. I am simply overwhelmed, I thought I would have to pay my friends to follow me. :) I may still have to pay my son . . .
I have read all of the comments and am still new at blogging, so I am not sure of the etiquette around responding. So, for now please except my blanket thank you for your support.
Since I am often on a craft budget, when I buy something I usually try to buy something with the most versatility as possible. So in the spirit of reduce, reuse, recycle, I want to recycle one of my favorite embossing folders.
Both cards started with Sizzix's Autumn Sunflowers Set.
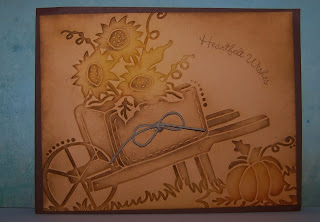
Card number one was my thanksgiving card last year and I made the original at Memento's Make and Take Tuesday. We embossed the Bazzill Kraft back ground paper and used Tim Holtz's Distress Ink pads and foam topped handles to gently apply ink to the raised areas on the page. This gave a very nice distressed country look. The colors we primarily used were scattered straw (sunflowers), walnut (the wheel barrow) and wild honey for the pumpkin. I also used the walnut to give the edges a little help.

I made a wall decoration for my second look, I loved the country look of the first but I have a hard time coloring outside the lines, I prefer clean lines.
I used a 6 by 9 canvas board as the backing. When you use canvas or a canvas board, you should apply a thin layer of gesso to seal the canvas, it also makes a great surface to ink on, the ink moves well, you have time to smooth things out, eliminating any rough lines or edges. Using walnut distress ink and a large stamp with words on it, I randomly stamped the edges of the background.
I embossed two 5.5 x 8.5 sheets of tiara white paper and cut out the sunflowers, wheel barrow and pumpkin. I left the squigglies and leaves behind. I inked them with the same colors I used in the previous card. and use brushed corduroy on the edges.I also used peeled paint for the leaves and grass. To give emphasis to some of the elements I used a foam makeup applicator (dollar store find) and rubbed it directly on to the ink pad, and then lightly layered color on the elements I wanted to emphasis. I glued the wheel barrow straight down over the embossed card and pop dotted the pumpkin and flowers, adding a little Glossy Accents for shine. Finally I stamped the sentiment, "So Thankful" which seemed to be the perfect thing to say.
One of the reason's that I love Jill Foster's Stamp of the Month club, is that it appeals to my sense of frugality, she will use one stamp or a set of stamps and you get 3 completely different looks (Check out Jill's classes at http://www.ilovemementos.com/ ).
That's it for today, as my favorite AA Milne character says, TTFN (ta ta for now)
Saturday, October 8, 2011
First Post Ever!
Welcome to my blog. I've started this blog with much encouragement and real help from my friend Jill Foster, blogger, designer, teacher and paper crafter extraordinaire. She recently featured several of my cards on her own blog at http://stampinginspiredby.blogspot.com/ Thank you Jill for all your words of encouragement and thank you to all the wonderful women of your blog who took the time to write such wonderful and positive comments.
I would also like to thank 3 of my other friends who also encouraged me, put up with me when I get excited about some project or weird piece of ephermera that I just know would be perfect for something and help me ALL the time. Jill Nelson, who turned me on to stamping over 20 years ago (she's put up with me the longest :) ), Lisa Nickle, who lets me play with her stuff, helps support my craft habit and helped me create this blog and Barb Dunlop, cousin multiple times removed who has such an infectious positive attitude and the enthusiasm of a new crafter.
Now for the good stuff. One of my favorite techniques that I have learned from Jill F, is a tone on tone background..
 All paper used starts out as white. the color all comes from TH Distress Inks. I created the background using Black Soot as an overall base, the ink is applied using one TH's handles and a foam pad, don't worry if the layer isn't completely even, once you stamp, the variations become part of the overall design.I used damask background stamp inked with the same black ink and stamped it over the entire background. You can use any stamp as the background, just cover the entire card. This is the perfect way to make a matching background for any color combination.
 See you soon, Peggy
Subscribe to:
Posts (Atom)